I decided that the donor 20″ forks I had were too ugly, heavy and rusted up to be reasonable candidates for my recumbent. There’s no motivation for front suspension on a long wheelbase bike*, so here’s a recipe for a better solution.
Ingredients:
1 set of 26″ forks from my old bike
1 20″ wheel for testing
Preparation Time: 30 mins
Cut the dropouts from the forks, and grind off any stubborn tubing. Measure the clearance from the bridge to the dropout slots on the old 20″ fork. Mark the same distance on the 26″ fork and trim to length. Fit dropouts and check by installing the wheel. Adjust until wheel is centred, removing a small amount of metal each time. Once alignment is attained, tap dropouts home with hammer. Check again then weld.
Here’s how mine turned out (before welding):

and with the wheel in place:

I like this much better than the originals.
*As I won’t be leaning on handlebars on top of the front forks I won’t feel the bumps in the road so acutely. The long boom will flex a little too, smoothing out the ride.
The seat is basically done. Primed, painted, and three layers of exercise mat foam glued in place:

I’ll round off the front edge sometime and that may be sufficient. Some sort of cover (lycra? 3D mesh?) may be necessary, though the bare foam is comfortable and seems quite resilient.
I’ve finished all the steel cutting and preparation with the exception of the steering gear. That needs to fit the actual (as opposed to intended) frame geometry so is best left until later in the process. I have no free time for a while, and expect that welding won’t start for a few weeks.
The guys at MetalSupermarkets in Burnaby are patient and extremely helpful. I showed up with a partial shopping list and a vague description about what I’m trying to accomplish. They helped me find everything I needed (browsing the racks was very useful). So now I’ve got all the steel, and have started on tube mitres, seat mounts and the bottom bracket clamp.
I’m done with the graphics too – here’s the head tube badge:

I don’t have time for steel shopping for a couple of weeks, and with all the deconstruction done I’m at a bit of an impasse. I want my finished bike to look at least as good as a commercial model so I’ve been thinking about the finish. Ferrari yellow is nicely ironic (and high-visibility) for the main frame, with the rest classic black.
This is for each side of the suspension arm:

‘GP’ stands for ‘geezer powered’ (based on an allusion a friend made to recumbent bikes in general). That ‘design works’ is my own long-held assertion. ‘Flow’ is apropos of nothing.
For the main boom this is the unoriginal work in progress:

I’m still thinking about the head tube badge. To get the designs onto the bike I’ll print them on decal sheets and apply them before the clear-coat.
 The plans require two idlers to route the tight side of the chain through an elongated ‘Z’ (over the chainstay and under the seat) on its way to the chainrings. Since I don’t have any chainstays I intend to keep a cleaner line and just use one of these mighty sprockets. It was initially too wide to fit my multispeed chain but was easy to modify. A couple of further adaptations are plausible, namely:
- making a keeper from an old front derailleur
- allowing the sprocket to float laterally on its shaft so it can slide as the chain shifts gears
but I don’t think either will be critical. Although the chain will run on the underside of the sprocket it should be pulled tight enough by the chainrings to maintain contact. The distance from the idler to the rear cluster will likely be more than the span on a regular bike, and there should be enough flex in the chain to allow smooth shifting at that distance. We’ll see.
A moderate amount of cutting and grinding later, and here are some parts for reuse:

Clockwise from left:
- front forks with head tube
- rear suspension arm
- bottom bracket with derailleur mount tube
- head and steerer tube for under seat steering.
The suspension arm includes the pivot tube surgically extracted from the old frame, and that head tube will be cut down significantly as the USS doesn’t need the heft.
I’ll also reuse most of the components from the donor bike, including the brakes, cranks, derailleurs, levers and shifters. They are all serviceable though not high-end. Once I have a working bike it’ll be trivial to upgrade them if I’m so inclined.
The donor bike broke down into its constituent parts quite easily. Everything seems to be in reasonable shape, just in need of cleaning up and a good greasing.
The parts I’ll be using are:
- rear wheel, suspension arm and brake
- entire drivetrain (I’ll have to cut the bottom bracket from the frame)
- shifters and brake levers (unless I find better ones)
- head and steerer tube (for my under-seat steering)
The LongShot front wheel and fork will come from another scrap bike.
The seat is now full of holes, sanded and ready to prime and paint:

Then I’ll stick some suitable foam to the face and it’ll be done. The oval slot at the top is a handle for wheeling the bike along as using the handlebars won’t be very practical.
It was relatively trivial to transfer that curvy line onto some scrap 2×8 to make a pattern. Getting the ¼” ply to conform nicely was a little more challenging, but eventually the 3 layers were glued and clamped and left to settle for a few days. While that was happening I drew a template for the seat outline, including a pattern of holes to improve ventilation and reduce weight. That outline looks like this:

The ply did spring back a little when the clamps came off, but not enough to be a problem. After cutting I ended up with this:

It’s pretty comfortable. Next step – fill it full of holes.
I haven’t had much time to work on this project lately, but that doesn’t stop me thinking about it. Since I plan to spend lots of time riding this machine my thoughts have turned to seating.
The plans describe a basic 2-piece ‘plywood-and-foam + neck rest‘ construction but there is ample scope for some creativity. I like the look of commercial seats like this:
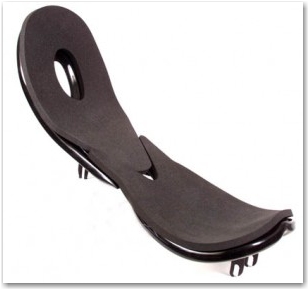 The enormous price tag sort of violates the project principles¹. Of course there are many ways to build seats, and predictably others have tried it and are willing to share their experiences. After some research I’m thinking of taking some plywood and laminating my own curvy deliciousness. Here’s my initial profile overlaid on a sketch of the basic seat from the plans:

Not too much deviation from the original design but adds some lumbar support and removes the need for a separate neck rest. Looks good on paper anyway.
¹Less of a concrete manifesto than a vague intent to reuse and construct – rather than purchase – wherever possible. The cost is time, but job satisfaction and acquisition of new skills should make it worthwhile.