Longshot
September 9th, 2010
I’m thinking about building a long wheel base recumbent bike, based on the plans I’ve got for this Atomic Zombie ‘Voyageur’. We’ll see how far this gets, hence the project name ‘Longshot‘

I’m thinking about building a long wheel base recumbent bike, based on the plans I’ve got for this Atomic Zombie ‘Voyageur’. We’ll see how far this gets, hence the project name ‘Longshot‘
The plans are extremely detailed (very good) and only basic skills are assumed (even better). However, the author is clearly extremely adept with an angle grinder, and the photos make mitering steel tube for welding look easy. This seems unlikely.
I came across this calculator which will make life a lot easier. Enter in the tube size and required angle and voila!

Wrap that around your tube and you’re ready to go.
The Long Shot will be constructed from components salvaged from other bikes, appropriately called ‘donors’. Courtesy of craigslist here is my main source:

As evident from the picture of the finished machine, the rear end is used intact. One of my children’s old bikes will supply the front forks and wheel, with an ancient bike of mine maybe providing a component or two.
I haven’t had much time to work on this project lately, but that doesn’t stop me thinking about it. Since I plan to spend lots of time riding this machine my thoughts have turned to seating.
The plans describe a basic 2-piece ‘plywood-and-foam + neck rest‘ construction but there is ample scope for some creativity. I like the look of commercial seats like this:
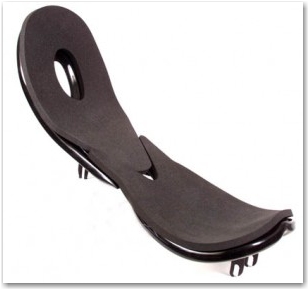 The enormous price tag sort of violates the project principles¹. Of course there are many ways to build seats, and predictably others have tried it and are willing to share their experiences. After some research I’m thinking of taking some plywood and laminating my own curvy deliciousness. Here’s my initial profile overlaid on a sketch of the basic seat from the plans:

Not too much deviation from the original design but adds some lumbar support and removes the need for a separate neck rest. Looks good on paper anyway.
¹Less of a concrete manifesto than a vague intent to reuse and construct – rather than purchase – wherever possible. The cost is time, but job satisfaction and acquisition of new skills should make it worthwhile.
It was relatively trivial to transfer that curvy line onto some scrap 2×8 to make a pattern. Getting the ¼” ply to conform nicely was a little more challenging, but eventually the 3 layers were glued and clamped and left to settle for a few days. While that was happening I drew a template for the seat outline, including a pattern of holes to improve ventilation and reduce weight. That outline looks like this:

The ply did spring back a little when the clamps came off, but not enough to be a problem. After cutting I ended up with this:

It’s pretty comfortable. Next step – fill it full of holes.
The seat is now full of holes, sanded and ready to prime and paint:

Then I’ll stick some suitable foam to the face and it’ll be done. The oval slot at the top is a handle for wheeling the bike along as using the handlebars won’t be very practical.
The donor bike broke down into its constituent parts quite easily. Everything seems to be in reasonable shape, just in need of cleaning up and a good greasing.
The parts I’ll be using are:
The LongShot front wheel and fork will come from another scrap bike.
A moderate amount of cutting and grinding later, and here are some parts for reuse:

Clockwise from left:
The suspension arm includes the pivot tube surgically extracted from the old frame, and that head tube will be cut down significantly as the USS doesn’t need the heft.
I’ll also reuse most of the components from the donor bike, including the brakes, cranks, derailleurs, levers and shifters. They are all serviceable though not high-end. Once I have a working bike it’ll be trivial to upgrade them if I’m so inclined.
 The plans require two idlers to route the tight side of the chain through an elongated ‘Z’ (over the chainstay and under the seat) on its way to the chainrings. Since I don’t have any chainstays I intend to keep a cleaner line and just use one of these mighty sprockets. It was initially too wide to fit my multispeed chain but was easy to modify. A couple of further adaptations are plausible, namely:
but I don’t think either will be critical. Although the chain will run on the underside of the sprocket it should be pulled tight enough by the chainrings to maintain contact. The distance from the idler to the rear cluster will likely be more than the span on a regular bike, and there should be enough flex in the chain to allow smooth shifting at that distance. We’ll see.
I don’t have time for steel shopping for a couple of weeks, and with all the deconstruction done I’m at a bit of an impasse. I want my finished bike to look at least as good as a commercial model so I’ve been thinking about the finish. Ferrari yellow is nicely ironic (and high-visibility) for the main frame, with the rest classic black.
This is for each side of the suspension arm:

‘GP’ stands for ‘geezer powered’ (based on an allusion a friend made to recumbent bikes in general). That ‘design works’ is my own long-held assertion. ‘Flow’ is apropos of nothing.
For the main boom this is the unoriginal work in progress:

I’m still thinking about the head tube badge. To get the designs onto the bike I’ll print them on decal sheets and apply them before the clear-coat.
The guys at MetalSupermarkets in Burnaby are patient and extremely helpful. I showed up with a partial shopping list and a vague description about what I’m trying to accomplish. They helped me find everything I needed (browsing the racks was very useful). So now I’ve got all the steel, and have started on tube mitres, seat mounts and the bottom bracket clamp.
I’m done with the graphics too – here’s the head tube badge:

The seat is basically done. Primed, painted, and three layers of exercise mat foam glued in place:

I’ll round off the front edge sometime and that may be sufficient. Some sort of cover (lycra? 3D mesh?) may be necessary, though the bare foam is comfortable and seems quite resilient.
I’ve finished all the steel cutting and preparation with the exception of the steering gear. That needs to fit the actual (as opposed to intended) frame geometry so is best left until later in the process. I have no free time for a while, and expect that welding won’t start for a few weeks.
I decided that the donor 20″ forks I had were too ugly, heavy and rusted up to be reasonable candidates for my recumbent. There’s no motivation for front suspension on a long wheelbase bike*, so here’s a recipe for a better solution.
Ingredients:
1 set of 26″ forks from my old bike
1 20″ wheel for testing
Preparation Time: 30 mins
Cut the dropouts from the forks, and grind off any stubborn tubing. Measure the clearance from the bridge to the dropout slots on the old 20″ fork. Mark the same distance on the 26″ fork and trim to length. Fit dropouts and check by installing the wheel. Adjust until wheel is centred, removing a small amount of metal each time. Once alignment is attained, tap dropouts home with hammer. Check again then weld.
Here’s how mine turned out (before welding):

and with the wheel in place:

I like this much better than the originals.
*As I won’t be leaning on handlebars on top of the front forks I won’t feel the bumps in the road so acutely. The long boom will flex a little too, smoothing out the ride.
This project would not have got beyond the theoretical without serious help from an extremely able friend of mine. It’s his workshop where much of the construction will take place, and it’s his welding expertise, gear and patience that’s making it all possible.
So, that fork came together nicely:

Then on to the frame. Though oxy-acetylene welding is slower than the electric arc approach I really like the relative quiet and ‘calm':

You get totally absorbed in the small puddle of molten steel 12″ from your face. Making it do what you want takes lots of practice, and I haven’t done this stuff since college. It’s challenging and fun and I’m learning a lot – here’s a sample of my work:

A vast amount of heat gets dumped into the workpiece and things cool down slowly. Because I did lots of prep there was usually another thing to work on while the previous piece was cooling. After some trial and adjustment, we had a mostly complete back end:

Add the seat tabs, then the seat and a wheel:

The front end should come together quite easily now. Here’s a clamped-together good approximation:

It should have been obvious all along but it’s only just sinking in. This is going to be a long ride.
All the structural work is done, and I have a rolling bike:

That ‘T’ at the front is where the headlights will go. Here’s another view:

It came together very well. My only initial concern is the spectacularly large turning circle – perhaps not surprising given the near 8′ wheelbase. Tweaking those outrageous handlebars will help.
Next comes chain (around 14 feet!), brakes, derailleurs and shifters. Then, finally, a test ride.
I resisted the urge to head to the top of the nearest hill for a Flintstone-style rolling test. Instead I fitted brakes and a rear derailleur and a very long chain:

Turns out I was quite wrong back in November when I speculated that a single idler would be sufficient. Of course, the reluctance of the chain to stay attached wasn’t enough to prevent a test ride.
It took a short while to get used to the low-down-feet-up position, but the steering felt quite natural. The bike is very smooth and stable and handles well even at low speed. I have to adjust the pedal position and I need a second idler then I’ll give it another try. Further and faster.
In the meantime, provisionally titled “Some Fat Bloke Stole My Bike” and with stellar accompaniment is the first ride in all its glory:
After some test rides I modified the steering linkage to make it more sensitive. Now I can comfortably do a U-turn in my street with room to spare. I think that’s decent for a bike with a wheelbase of nearly 8′, and though not exactly nimble, it’s sufficient to make it practical for street riding.

I fitted that front derailleur and have been zipping around getting a better feel for handling at speed. Sitting low down makes it feel like you’re steeply banking the turns, but I suspect that’s an illusion. Riding one-handed is easy – I haven’t quite summoned up the nerve for full hands-off. Looking back over your shoulder is practically impossible, so add a mirror to the shopping list.
The second idler is ready to weld in place to help manage the long chain. I cut all the cable guides and stops off my donor bikes, so I’ll be able to replace the temporary zip ties and miles of housing with long straight runs of naked cable. It’ll be much cleaner looking, and the reduced friction will make my shifters and brakes more responsive.
My part of the world is quite hilly, and recumbents are famous for not being able to climb hills. A recent test ride on the Seymour Valley Trailway reinforced this in no uncertain terms.

I found the longer climbs quite challenging: it’s very hard to balance when you’re going so slowly. It’s possible that my general level of fitness may increase and that I may lose a few pounds but lets not count on either of those. A better hope might be to increase cadence, i.e. drop to a lower gear and spin the pedals faster.
On my regular bike I can maintain 80-90 rpm on the flat. It’s easier to spin if you reduce the circumference of the circle your feet turn, so for my recumbent I’ll shorten the cranks.

It was trivial to drill them out, and the best bike shop on the North Shore John Henry Bikes tapped the holes for me. All I have to do is trim and round off the ends and I should be back in business.
Progress Note: The second idler and the cable guides are all attached. Once the bike is assembled again I’ll be spinning back up that hill.
The bike is back in one piece. The recent modifications are not hugely obvious but constitute a fair amount of change.

There’s room for improvement. The seat doesn’t quite match the angle of the seatpost and flexes slightly under load. Firmer attachment would make the seat conform, but the current 4 woodscrews would strip out. I think I’ll just bolt it down. The suspension unit is barely adequate and jerks rather than smoothing out the ride. I’ll service and adjust it, and maybe keep my eye open for a better quality replacement.
More test riding to do, but construction is basically finished. Soon I’ll have to strip it all down, break out the wire brush and prepare for painting.
That chain is turning out to be problematic.
Adding the second idler took up the slack and stopped the chain falling off. As a side effect it eliminated all the pedal bob. So far, so good. I set the suspension to compress about 25% under static load – the sag – and that pushes the pivot down a little. This brings the frame closer to the chain line, and when the chain is pulled tight it touches the frame:

Notice the small groove the chain has worn in the swingarm. On the smaller cogs there’s no problem, but riding in 1-3 causes some nasty rubbing.
Tightening the suspension so there’s no sag is a non-starter. That defeats the purpose of having suspension in the first place, and it won’t work: the shock isn’t long enough to prevent the rubbing. Pushing the idler and chain horizontally away from the frame won’t work either: the deviation needed to avoid that hefty swingarm is too great. I have a nasty feeling that some cutting and welding is going to be necessary, but first I have get my head around the geometry…
It looks like the reason for the insidious chain rub is the swingarm attitude. It’s flatter than in its original setup. Compare these pictures, starting with a detail of the donor bike.

A horizontal line from the pivot intersects the swingarm about 2/3 of the way down. On the Longshot the intersection is lower, passing almost through the dropout:

The effect is to raise the rear axle, lifting the chain line to the point where it hits the frame. So the question is how to push the axle back down? I could move the seat post back, but that would be an offensive amount of work and disruption. I could make new upper shock mounts, increasing the standoff to rotate the swingarm around the existing pivot. It would work but doesn’t feel right – that junction takes a lot of stress and with the increased length any alignment error would make it prone to bending. I could move the main swingarm pivot closer to the seat post. The angle of the shock would be slightly steeper but I don’t think that’s a big deal.
There’s more thinking to do, but moving the main pivot seems like the best alternative.
After some pondering I settled on fixing the chain rub by moving the rear pivot. So I dismantled the bike, cut out the pivot tube and cut a new ‘fishmouth‘ in the main boom. I clamped the back-end in place to check the fit. All seemed well so I welded it back together.
It seems to have worked. I assembled the back end and the chain line clears the swingarm completely, even when the suspension is bottomed out. I say ‘seems’ because I’ve yet to build the complete bike and test ride it. I’m reasonably confident it’ll be OK, because the suspension will never be fully compressed: the worst that could happen is occasional chain slap.
So next steps are (1) rebuild the bike and test ride it, (2) break it down again and finally (3) prep and paint.
This is dragging a bit… I’d hoped to be done by now.
So it’s all back together…

…and as expected the chain line clears the swingarm just fine. I had to remove about 4″ of chain but I left the slightly long rear cables intact for now. It was fun to ride around on it again… feels like it’s been a while. One or two more test rides then I’ll strip it down and start the finish. Here’s another gratuitous picture…

Riding then tweaking then more riding. The only addition is some rubber mounts I made to isolate the seat from the frame. That’s it – things are as good as they’re going to get given my limited patience.
So the bike is dismantled and preparation for painting is underway. An angle grinder equipped with a wire-brush demands caution and respect, but makes short work of surface rust and welding scale. It all cleaned up a treat – here’s one of the braze-ons:

The first coat of primer will go on soon: the end is nigh.
Quintessentially dull, but I’ve been looking forward to reaching this stage for quite some time. Here are some freshly primed parts hanging in the high-tech paint shop:

Back in the paint shop – black and yellow topcoats drying in the sun.

The black went on nicely, and looks OK. The yellow – not so much. Getting a decent finish is hard, and demands skills and patience that I don’t have. It looks just passable from a distance, and I’ve no appetite for sanding it down and starting again. Next time I’d take more time, and maybe not go with such a light colour. Perhaps there’s a reason so many home-built bikes are full flat black.
That tiny red dot at the top of the seat tube is a 3 ball. Along with the carefully designed seat it’ll help when manhandling the bike. It adds a little retro chic too.

This picture also shows the ‘fade to black’ effect I attempted on the frame. The curve in the main tube is no optical illusion. I don’t know if it got that way from post-welding contraction (visible here?) or overloading while riding. It’s not getting measurably worse and there’s no cracking so I’m not unduly concerned.
I’ve had quite a bit of practice at putting this machine together, so it didn’t take too long to get from a box of parts to this:
 Next I’ll apply the graphics, then restring the chain and add some pedals. Below, closer views of the front and rear.


The bike is finished.
 I’m quite happy with the result. There’s a bigger picture with more details here.
Over the course of the project I took hundreds of pictures – here’s a selection.

Most people eventually ask how much it cost. Of course that depends on how you define it.* Here’s a list of purchases (anything else was salvaged, donated or found in the Craigslist ‘free’ section):
| Description | Cost | Comments |
|---|---|---|
| donor bike | $35 | craigslist |
| plywood and foam for seat | $35 | about 1/2 remaining |
| idlers | $14 | |
| rod ends | $24 | ouch |
| steel | $58 | |
| chain and cables | $45 | all new, rather than reused |
| welding supplies | $50 | |
| paint and supplies | $35 |
Say around $300 total. When the budget allows I’ll replace those tires with some slicks, maybe another $70.
Approximately comparable commercial machines are available. A local dealer has Rans and Bacchetta and Sun long wheelbase models, all of which are way out of my price range. And even if I had the money, I really can’t see myself on one of these:

This project is over and I have a unique new bike. I’ve acquired some skills and confidence and had some fun. It’s intensely satisfying to start with an idea and see it through to completion. The whole thing took way too long though. I’d guess there’s around 40-60 hours of work, so it’s a little dispiriting that it’s taken me a year to finish it.
Overall I think it’s been worthwhile… but I would say that, wouldn’t I?
The big question is, what’s next?
*I’ve included as costs any materials and components and project specific consumables. I’ve ignored anything I spent on tools because I plausibly needed them anyway and they’ll get plenty more use. I didn’t even try to account for my time.
I’ve done a few test rides in the course of the build, but now the bike’s finished I can actually go places on it. I’ve mentioned that it’s quite hilly here; I’m up at the top, so the homeward leg of any trip is going to be an effort.
My first outing was a 6Km round trip and went pretty well. The bike is smooth and stable and predictable. The seat creaks as it flexes which is a little irritating. Braking is reassuringly solid though not up to the performance of the disc brakes on my regular bike. Shifting is vague, but a little tuning should fix that. On the flat and especially downhill it’s great, grinding back up the hill is hard work.
Details
Outbound was 2.5Km steeply downhill, and lots of fun. Due to the (deliberately) low gearing I spin out at around 40Km/h… after that I’m coasting. From what I saw on the speedometer I got to ~53Km/h which feels very fast when you’re low down. Visibility at intersections is a minor problem – sitting so far behind the front wheel means you can’t see very far left and right. Exercising a little caution overcomes this. The return trip was hard, around 3.5Km with an average grade over 5%, some short sections over 10%. That might not sound like much but as noted here (my emphasis):
The biggest problem isn’t spinning the pedals – it’s balancing. The low centre of gravity makes it difficult to stay on at very low speeds. I expect hope that will improve with practice.
A slightly longer trip, with over an hour on the move giving me time to focus on how the bike handles and to enjoy the ride. I did 10Km up the Seymour Valley Trailway before I ran out of time and had to turn around and ride back. That 20Km plus the five or so to and from the trailhead made for a decent run.
Overall it was a similar experience to the previous ride – a treat on the flat, exciting downhill, a workout when climbing. The trail is paved but much of it was covered in wet leaves. This made me a little tentative, my top speed being just shy of 50Km/h. I spent a lot of time in the 5-10Km/h range hauling up hill (but balancing reasonably). I didn’t have to get off and walk on any of it, which pleasantly surprised me because last time the climbing was challenging. Mostly I just cruised along having a very nice time.
There’s some bob at low revs but generally everything feels fine. I’ve been thinking about how to adapt my old rack so next time I can take a pack with me. No other tweaks required.
The bike is pretty and unusual so it attracts a lot of attention. Several people asked me where I bought it and how much it cost and seemed surprised when told it’s hand made. That’s a nice feeling.
I’ve done a couple of hundred km and whilst it’s been lots of fun I feel there are a few minor alterations needed. I’ll keep riding and thinking about what could be better until the weather turns crappy in the fall. By then I’ll have a (not too long?) list of tweaks, including:
I’ll add any more stuff here as it comes up.